Monday, June 27, 2022

Trip to Portugal and Spain: Days 4 and 5 (Porto)

Getting to Porto

We had initially considered renting a one way car to Porto, but after learning there were inexpensive bus fares from Liston to Porto we decided to travel by bus. Specifically we used FlixBus again and paid  84 EUR for 4 tickets. Our bus departed 11:30am from Porto and arrived close to 3pm at the Camelias bus stop, which was a short walk from our hotel at Sao Bento.

Where to eat

One recommendation from our Uber driver was to eat at Cafe Santiago, and try the Francesinha which is a typical dish from Porto. I actually thought it was pretty good, my for the rest of my family it was just OK. They will have this dish at most restaurants so you will have plenty of chances to try it even if you can't make it to Cafe Santiago.

Visiting the shore

Our first day we decided to do some sightseeing by walking from Sao Bento towards the shore. We walk past the Santo Ildefonso Church which is beautiful. Just down the street we stopped by Sao Bento terminal which is a must see.

On our way down to the shore we stopped by Chocolateria Ecuador and had a sample of their chocolate truffle with a glass of Porto wine, they were both delicious.

We then made it down to the shore and walked along towards the Luis I bridge and cross through the lower walkway. The view from across the river is even better as you can see from this postcard worthy picture.


On that side is where you can find most of the wineries, however they were closed as they open primarily in the morning through early afternoon. We ended up having dinner at Tabernha do Manel which was pretty good. 

We then headed up the hill toward Mirador da Ribeira to be able to view the sunset near the upper end of Ponte Luis I bridge. This was another beautiful view of Porto. We ended up heading back to our hotel walking as we were only about a mile away.


Livraria Lello

The next day we started by visiting Livraria Lello which is one of the most beautiful bookstores in the world and allegedly J.K. Rowling was inspired while writing the first Harry Potter books. You will need to buy tickets to enter but you can buy them online and will save you from standing on the longer line to enter. Next to the bookstore we stopped by one of our favorite ice cream shops: Amorino


A couple blocks away we visited Igreja do Carmo and just a block away we stopped by the Museum of Science and Natural History. Because it was under renovation, they only had to exhibits open, but admission was free so we decided to take a quick peek.
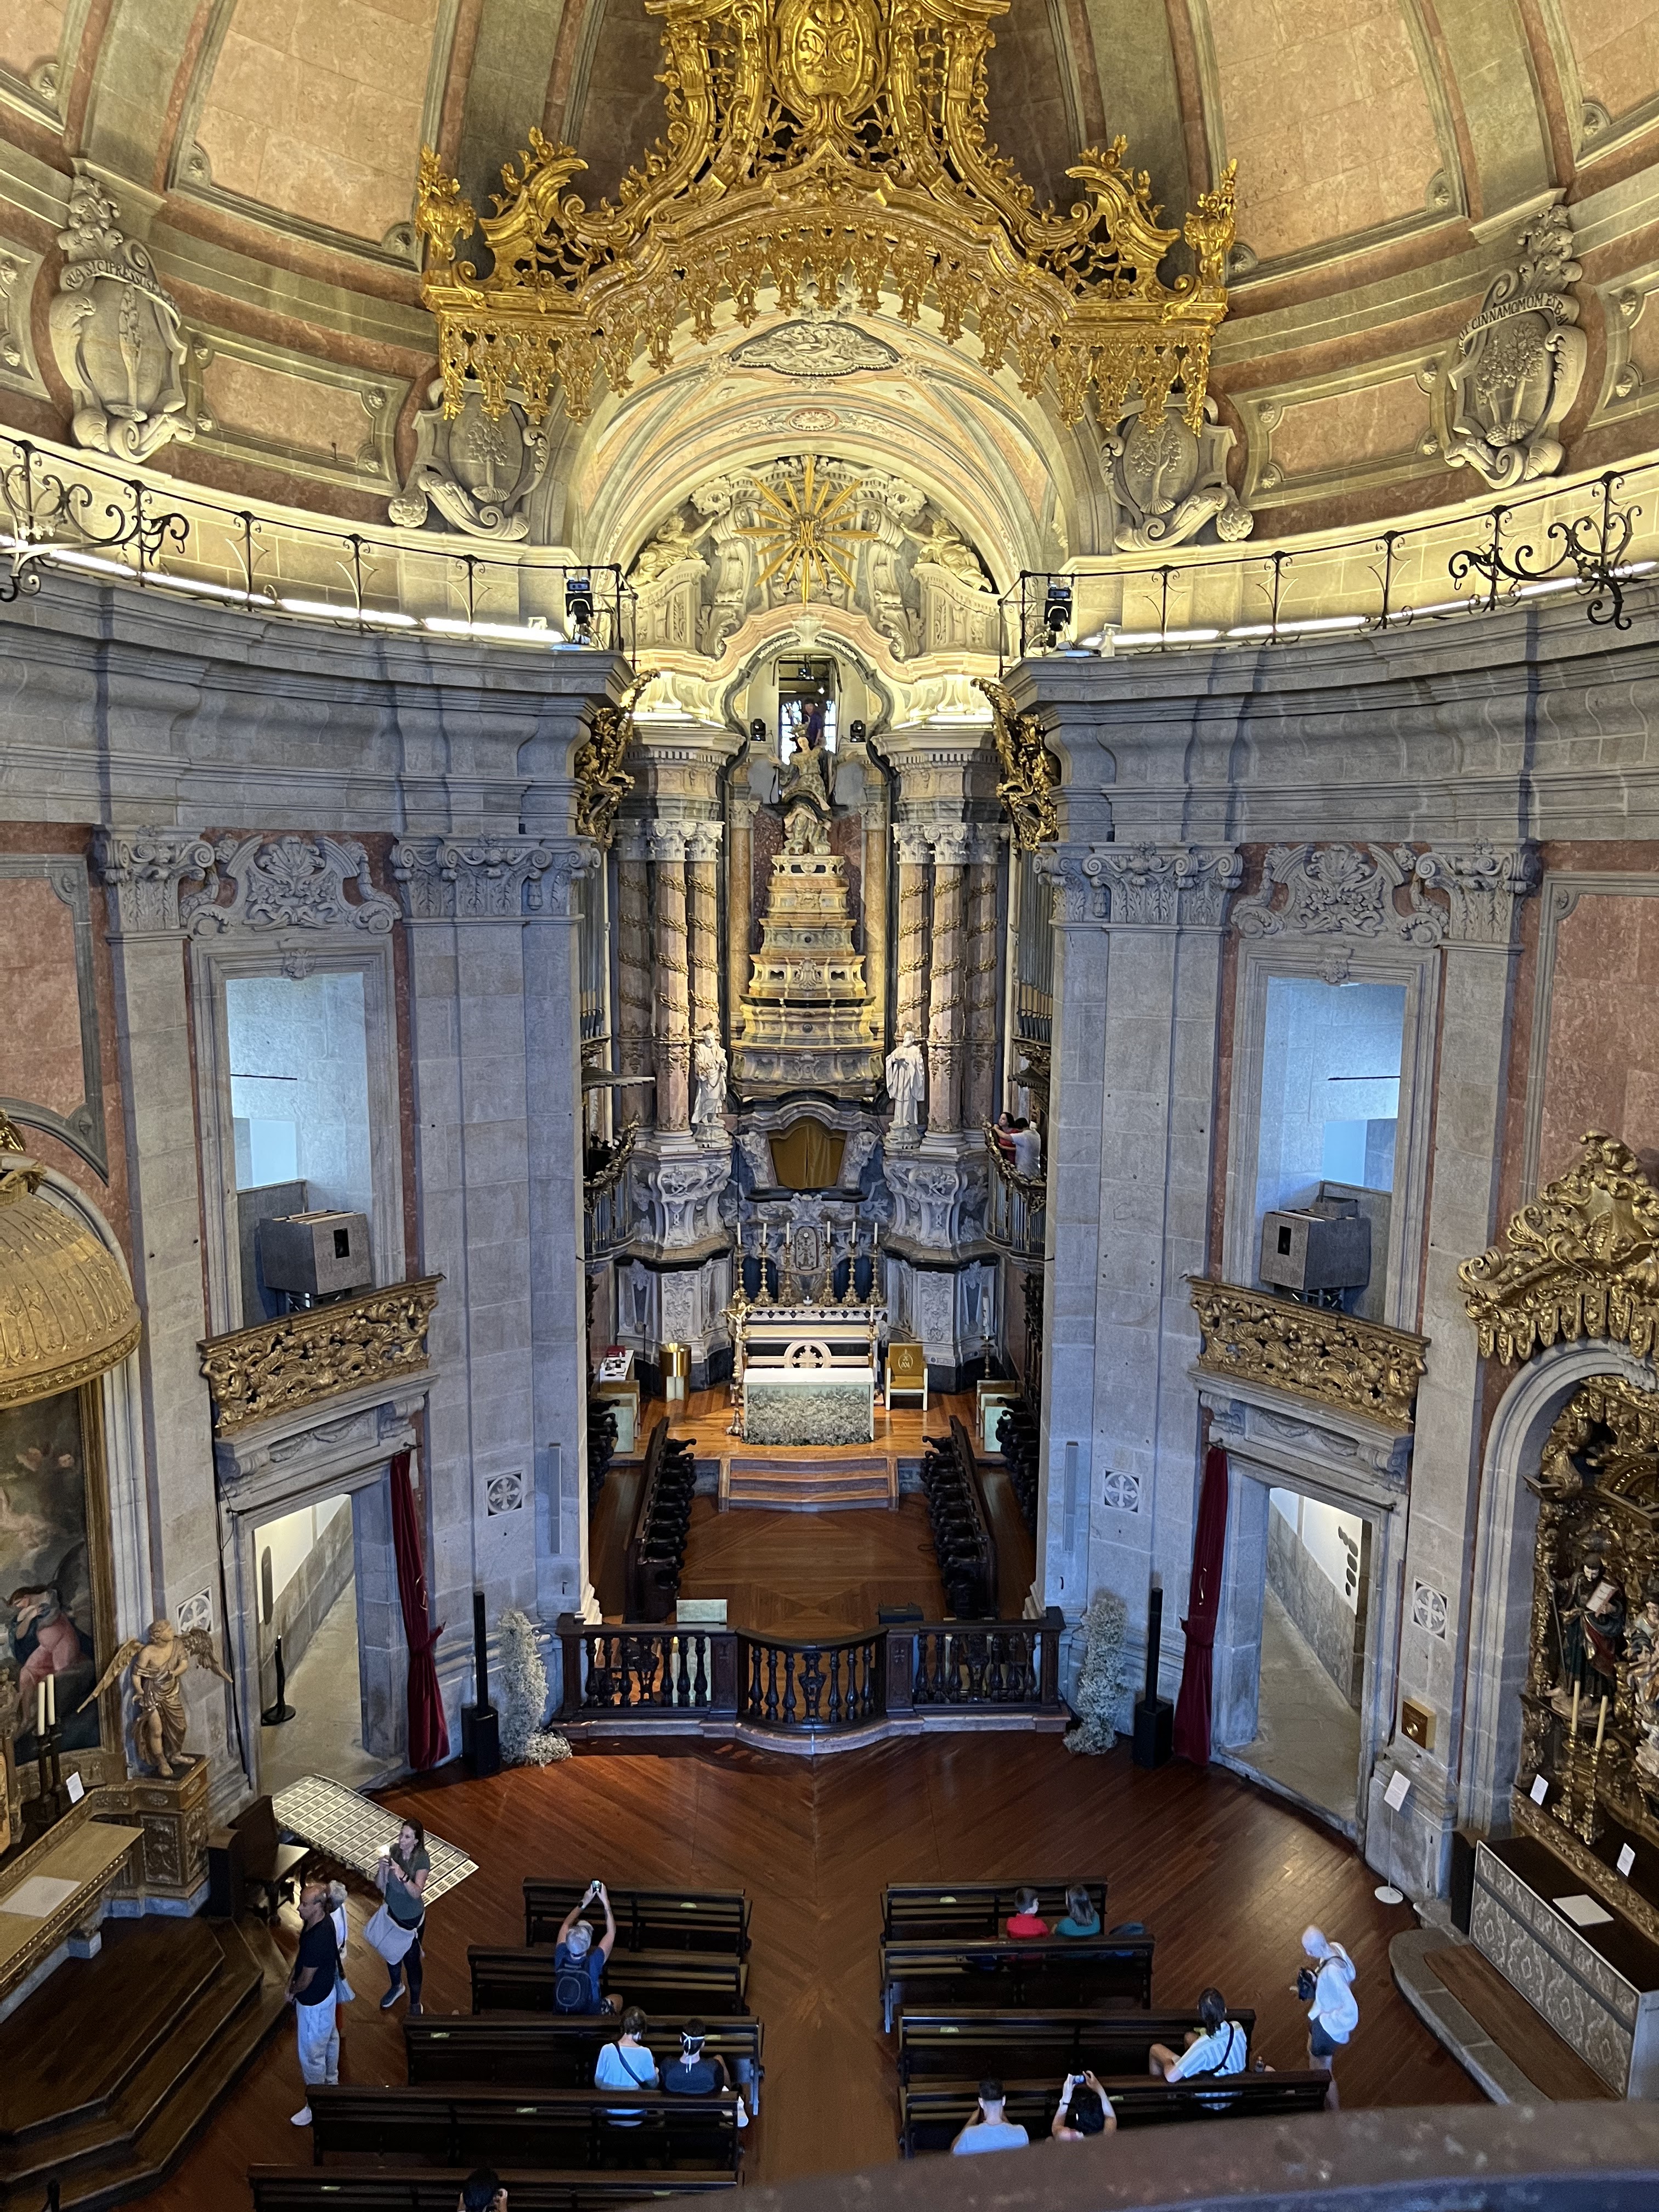
Igreja dos Clerigos

Our next stop was Igreja dos Clerigos which is a must see. It also requires timed tickets to go up the church tower. My wife says that every church that has a tower we must climb it, but this one in particular is a must see because as you are going up towards the tower they make you go around the church so you get to see the church from some very unique sides and the view from the top of the tower does not disappoint.

Igreja dos Clérigos

View from Torre dos Clerigos

Casa da Musica

My son wanted to visit Casa da Musica and because we had some extra time we decided to venture there. This location is about 2 miles aways from downtown so we decided to take the bus on our way there. Before entering it was lunch time and we ate outside on a restaurant called Ghrelador do Boavista 39. We found this restaurant by luck and my wife chose it because she said it looks like this is a place where most locals come to it. We had one of the best meals of our trip here, so I definitely recommend it if you head out this way.

You can only visit the inside of Casa da Musica by tour and the day we visited they only had tours at 11am and 4pm. Luckily we got there shortly before 4pm. I would stay this is a must see if you have musicians in your family, otherwise you may not enjoy it as much, but it is certainly a very unique music venue and the tour guide made it a very insightful visit. I would definitely would recommend attending a concert there if there is one and have the time.

Inside Casa da Musica

Spiritus

While we were visiting Tower dos Clerigos, they were promoting the Spiritus light show and we decided to buy tickets. We came back for the show in the evenings and it was really worth it. It was a little awkward to view it inside a church, but it was designed specifically for this church and it was by far better than the overly promoted Immersive Van Gogh.


Thursday, June 23, 2022

Trip to Portugal and Spain: Day 3 (Sintra)

Sintra was not initially in our list of must see destinations until a friend strongly recommended it, and she was right. Sintra is about 25km away from Lisbon and about a 30 minute drive without traffic.

Getting to Sintra

We were initially going to take a train to Sintra but it would have taken us nearly an hour to get there from hour hotel. After seeing that it we could get an Uber for around 25 EUR and get there in 30 minutes we decided to go for that. I would still recommend requesting that the Uber drops you at the train station instead of downtown Sintra since that is where you can easily buy the local bus tickets.

Moving around Sintra

We love to walk when possible, but unfortunately the roads to the Sintra castles are very narrow and steep. From our research we learned that the best way to get around the Sintra castles was using local bus 434. We tried buying bus tickets ahead of time, but the agency website would not take my credit card because it assumed a local postal code which does not match the format for US zip codes. When we got to the train station, on the outside you will see the signs to get on the bus (#434). Before boarding the bus there were agents who you could buy the ticket from for EUR 11.50. This includes unlimited usage per day, as well as other routes, e.g. 435 to get to Quinta de Regaleira and Palace of Monserrate, as well as the bus route  that can take you to Cascais (1hr away). We heard great things about Cascais, but from my experience there would not be enough time to visit both places on the same day. 


Pena Palace

Pena Palace is a must see within Sintra. We bought tickets ahead of time on their website. I bought the ticket for both the park and the palace. The Palace ticket requires a timed entry, but not the park. I would allow at least 1 hour for the palace time entry from the time you estimate you will reach the Sintra train station. Bus 434 has frequent stops, almost every 10 minutes, but it takes about 20 minutes for the bus to get to the Park entrance and then another 20 minutes to walk up to the castle. The palace is beautiful on the inside, but if you are limited in time I would suggest only buying the park ticket. There is a lot you can see from the outside of the Palace. Also you will see from the picture that it was very foggy and windy. We were told by our Uber driver that is a typical Sintra wether and eve though it was warm in Lisbon, Sintra weather can be 10C/20F degrees lower, so bring a light jacket.


Where to eat

Our Uber driver recommended 2 spots. "Casa do Preto" we were told people from Lisbon come here just to eat here. This is towards the city entrance, but bus 434 stops there. We wanted to eat there but to maximize our time we decided to go with his second recommendation which was "O Melhor Croissant da Minha Rua", which means "the best croissant of my street" and indeed they were likely the best croissants in the area.

Palace of Monserrate

We chose to visit Palace of Monserrate next as it looked beautiful in the pictures and indeed it was. However getting there was not as easy. You have to take bus 435 which was a smaller bus and with much less frequency. We waited about 30 minutes on the way in and another 25 minutes on the way back, so if you are limited in time I would not recommend going here.


Inside Palace of Monserrate


On the way our bus stopped by Quinta de Regaleira which we would have stopped if the bus stopped more frequently. 


The other castle we wanted to visit if we had more time was the Moorish Castle which we left for our next visit to Sintra. We took an Uber back to Lisbon and since it was rush hour (around 5pm), it took a little longer to get back, but nothing too crazy.


Trip to Portugal and Spain: Day 2 (Fatima)

Getting to Fatima

Being Catholic, visiting Fatima was one of the top reasons for this trip, hence we decided to start our trip with that visit. From my research I found out that getting by bus was the best option in terms of cost, time and options. There were primarily 2 bus companies: FlixBus and Rede Expressos. With Rede Expressos you have a few more time options because there are about 3 brands part of that network. However FlixBus had enough options for us and it seems slightly more convenient to book (they even take ApplePay). I found out Oriente station gave us the most direct route (nonstop). We booked our trip leaving around 11am and returning around 6pm. I figured 6 hours should be enough time for our visit (it ended up being about an hour short). Our roundtrip fare was about 60 EUR for a family of four (we booked about 2+ weeks ahead of time to get this fare).

We took an Uber to Oriente station. The buses depart from the parking right outside the Terminal. Our bus departed on time. I do recommend you pay the extra fee to book your seats ahead of time. The bus had wifi and worked surprisingly well. It also had USB ports but the one in our seats was not operational. Once you get to the Fatima bus station, the Basilica is within a 5 minute walk.

Shrine of Fatima

We started our visit to the Chapel of the Apparitions, the visited the Basilica of Our Lady of the Rosary of Fatima. To my surprise it was not too crowded, but it was a weekday and it wasn't a 13th of the month which I hear are the busiest days (May through October).


On your way from the Basilica of the Most Holy Trinity (new larger church) to the Basilica of the Our Lady of Fatima, on the right side there is a piece of the Berlin Wall that is easy to miss if you don't look for it.

Inside the Basilica of the Most Holy Trinity there are 3 additional chapels where you can attend mass if you have time. You can check the mass schedule here. There is also a museum that you cannot miss. That is where you can find the Crown of Our Lady of Fatima with one of the bullets with which Pope John Paul II was shot.


Where to eat

One of our Uber drivers had recommended Sao Francisco Churrasqueira, which is close to the house where Francisco and Jacinta lived, but since we were still in the Sanctuary area we decided to eat at Casa Platano, at that ended up being one of the best restaurants of our trip. Unless you are running short on time, I strongly recommend eating here, you won't be disappointed. 

Pilgrimage to Lucia's house

As much as we would have liked to take the 130km pilgrimage from Lisbon to Fatima, we didn't have enough time in this trip. Instead we took a mini pilgrimage to Lucia's house via the Way of the Cross. From the Sanctuary walk 1km south on Dom Jose Alves Correia Avenue (same road you walked from the bus station) until you reach the roundabout with the Three Little Shepherds monument. From there search for the walking path with the "Via-Sacra/Caminho dos Pastorinhos" sign. That is a Way of the Cross with the 14 stations that will take you straight to Lucia's house.


After visiting Lucia's house, be sure to also visit Francisco and Jacinta's house which is just a couple blocks away. We decided to walk back to the Bus station via the way of the cross stopping at Loca do Cabeco (one of the apparition sites), and then through the 11-14th stations of the cross you can reach Calvario Hungaro

Getting back to Lisbon

From Calvario Hungaro we took a nice trail path towards the Bus Station, but I would only advice taking this if you have GPS, as there were not a lot of trail signs in this path. 

We had to rush back to the Bus Station only to find out that our bus was delayed 20 minutes. The FlixBus app showed this delay in the route details, but it did not notify me. I believe there was an option to opt in for notifications which I did not sign up for, so I suggest you opt in for this option. Other than that it was as smooth trip back to Lisbon Oriente and we took an Uber back to hour hotel. 


Tuesday, June 21, 2022

Trip to Portugal and Spain: Day 1 (Lisbon)

 Lisbon Airport

Our trip arrived almost an hour ahead of time before 10am. European airports always confused me in that you arrive at the terminal and can walk through the terminal instead of going through immigration first. The reason is because you are arriving at an International terminal and you must go through passport control to exit. The passport control line did not look too bad but we ended up in line for about 40 minutes. The good news is by that time our luggage was waiting for us.

Getting around Lisbon

Unlike other European cities getting around by train did not seem to be the fastest and not significantly cheaper option. When I checked for ride share options in the Google Maps app, Uber did not come up as an option. However I tried the Uber application directly and to my surprise the ride from the airport to our hotel was less than €10 euros. Granted the Lisbon airport is within the city, but it was still 8 km (15 minutes) away. Compared to rates in the US, the Uber fares were significantly lower. The pickup spot from Terminal 1 was at a parking outside the terminal named "Kiss and Fly". It's hard to miss, because it is very crowded.

We arrived at our hotel around noon and our room was not ready. We left our luggage and ate at a restaurant nearby named Banze. It was actually pretty good, but in general most restaurants we went to in Lisbon were pretty good. 

Lisbon Sightseeing

After we settled in our hotel room we decided to venture downtown walking. Our first stop was the Observation Deck at Park Eduardo VII which has a really nice view of the city.


From there we decided to walk towards the pier walking through Liberdade Avenue, which is one of their main streets with many stores and restaurants. In our way there we discovered "Fabrica da Nata" which sells the typical "Pasteis de Nata", which are pastries with Boston cream and are pretty good. They also sell croissant sandwiches and baguettes and it is very inexpensive so we ended up having dinner there. 

We walked past the Sant Justa lift on Aurea street and eventually made it to Cais das Columnas on the pier which is another landmark you can't miss! From there we took an Uber back to the hotel which was also surprisingly cheap (around €6 EUR).
Santa Justa lift

Cais das Columnas


Monday, June 20, 2022

Trip to Portugal and Spain: Day 0 (Itinerary)

This June 2022, my family of 4 took a trip to Portugal and Spain with a custom itinerary. In this blog series I'll share some tips and suggestions in case you are venturing on a similar trip.

Our itinerary

Day 0: Washington Dulles (IAD) - Lisbon (LIS)

Day 1: Lisbon sightseeing

Day 2: Fatima

Day 3: Sintra

Day 4-5: Porto

Day 6-7: Seville

Day 8-9: Valencia

Day 10: Lisbon

Day 11: LIS-IAD

Pre-flight tips

We decided to fly out of Washington Dulles because we live 4 hours away driving and United had a direct flight. We booked our flight around February and was able to get a very good air fare ($600). 

Parking

Parking at Dulles is not prohibitively expensive compared to other major US airports ($12/day at Economy parking). However we were able to find much cheaper parking ($6) using SpotHero by parking at a nearby hotel. Specifically we parked at the Fairfield Inn Dulles and their shuttle service was very convenient and fast since it is a short drive away. 

Covid requirements

As of June 2022, the requirements to travel to Europe were fairly flexible. You essentially have 3 options: 

  1. Provide a negative PCR or rapid (antigen) test
  2. Provide proof of full vaccination no older than 270 days (unless you have a booster)
  3. Provide a certificate from a doctor indicating that you had COVID and were already recovered
All of these 3 options can be provided no earlier than 72 hrs ahead of your flight time and only required for passengers older than 12 years old.

Our flight to Lisbon

Our flight to Lisbon was uneventful which is always good. It departed on Sunday 10:20pm. We arrived at the airport around 8pm and there were barely any lines or wait times. Our flight was on time and boarded promptly 40 minutes ahead of departure. The airplane was a 757-200, which is a relatively old plan, but it had TVs on all backseats as well as the option to use your device for in flight entertainment. We got served dinner close to midnight which is one of the few times I've declined a meal on a flight. Our total flight time was slightly under 7 hours which is not bad for a transatlantic flight. We were served a breakfast snack (yogurt and bread) around 9am local time, just one hour before landing.


Saturday, November 06, 2021

Disney Genie+ review: tips, tricks and how does it compare to FastPass

This article is based on my experience traveling to Disney World for 4 days in Oct 30 through Nov 2nd, 2021 (still during the pandemic) for a family of 4 with the Park Hopper option and Genie+ service added.

What is Disney Genie+ Service in a nutshell?

Disney Genie+ in a nutshell, is a way for Disney to charge you for what FastPass used to be. The FastPass is now called either Genie+ Lightning Lane (included with Genie+) or Individual Lightning Lane (additional cost). 

There are however some key differences:

  1. It is not free, it costs $15 per day per person.
  2. Not every ride that was included in FastPass is included with Genie+, specifically the 2 most “popular” rides per park are not included (more on that later).
  3. You cannot book 30 days in advanced (or 60 with Disney Resort reservation), instead you book the same day at 7am local time and you must have a valid reservation for that park (more on that later)


Rules of engagement

There are similar rules as FastPass:
  • You can only book one LightningLane every 2 hours or until you use your pass (whichever comes first).
  • You can book a second LightningLane 2 hours after park opening
  • Unlike FastPass you cannot use LightningLane for the same ride on the same day.
  • You are allowed to book overlapping times (this used to be a FastPass restriction) - there is a trick to get 2 active LightningLane passes at a time (more on that later)
  • You must have a valid park reservation to book a LightningLane in that park, unless you have ParkHopper and the LightningLane time is after 2pm.

The application experience

Along with the launch of the Disney Genie Service, Disney released a new version of their Disney World experience. The Disney Genie Service is supposed to be a “genie” that suggests the best things to do based on some input you provide. In my opinion they tried to pack too much in the app and the genie is really not that smart, making the app experience worse specially when it comes to the FastApp experience.

There is a new screen called the "Tip board" this will display the estimated wait times as well as the next Genie+ Lightning Lane availability times for one park. This is convenient if you are trying to decide what to do next, but if you are trying to get on one specific ride, there is no such a view anymore. 


With the FastPass experience you used to be able to refresh the screen to view the latest FastPass availability time. You could just pull down to refresh and the time will occasionally change, either due to cancellations during the day or because it was filling up during the morning. My biggest complain is that there is no option to change to the latest time available. You actually have to first cancel your Lightning Lane reservation by going into a different screen then come back via either the map view or Tip Board screen. By the time you do that, the time that was available will often change and you risk losing the reservation you already had. You used to be able to do this with the FastPass experience and it was a way to sneak into a better time. My take is that this will be added to the app later on.


The Lightning Lane experience

The line experience is virtually the same as with FastPass. Where there used to be FastPass lanes/signs, they are now called Lightning Lane. I would say lines may be slightly shorter than before now that they are no longer included and not everybody is paying for it, but it wasn't something significantly different as before.

What is Individual Lightning Lane?

There are 2 rides per park that are not included with Genie+. These rides are presumably the ones with the most demand in each park, which means Disney could arbitrarily change them in the future. The fees for these rides are dynamic and can vary from $9 to $15. The good news is that you do not need to buy Genie+ to buy these individual rides. The Individual Lightning Lane rides available at the time of writing (with approximate price offered at the time):
  • Magic Kingdom
    • Seven Dwarfs Mine Train ($12)
    • Space Mountian ($9)
  • Epcot
    • Frozen Ever After ($9)
    • Remy's Ratatouille Adventure ($15)
  • Hollywood Studios
    • Rise of the Resistance ($15)
    • Mickey & Minnie Runaway train ($12)
  • Animal Kingdom
    • Expedition Everest ($8)
    • Avatar Flight of Passage ($12)
Another restriction I noticed is that the 7am booking time appears to be available only for Disney Hotel Resort guests, otherwise it is available for purchase at 9am or at park opening time.

Although we didn't pay for Individual Lightning Lane this time, the only 2 exceptions I would consider are these (both will sell out within hours so don't wait too long for purchasing): 
  • Remy's Ratatouille Adventure - in case you are not able to get into the virtual queue
  • Rise of the Resistance - if you are not willing to wait 90+ minutes in line or are running short on time.

What is Virtual Queue?

At this point time, it is just one of 2 ways you can get into the Ratatouille ride (the other one being paying for the Individual Lightning Lane). In my opinion is something Disney is experimenting with. If you cannot get into the Virtual Queue either at 7am or 1pm then you are out of luck, unless you're willing (while still available) to pay for Lightning Lane. My only complaint about Virtual Queue, is that for any other ride at Disney, if you're willing to wait in line regardless of wait time, you can get on the ride without paying, except for this one. You also have to still wait approximately 30 minutes in the physical line once your turn to line up comes up.

Genie+ Tips and tricks

  • You can actually get 2 active Lightning Lane tickets at a time, if you book a pass for something that is 2 hrs after opening time. After that 2-hr period you will be able to book a second pass and it will let you keep both active (with the same rules in place, i.e. you can only get a new one after using either one or within 2hrs). For example if you got a 2pm pass for Slinky Dog Dash, and the park opened at 9am, at 11am you could get a second LightningLane pass. This is a good strategy if you got to the park early since that is when the lines have the lowest wait time.
  • Similar to FastPass, you can only book your next pass until you scan the second Lightning Lane checkpoint (there are 2 per ride): one at the entrance and the other one before merging with the rest of the line.
  • Even though you can’t swap to another Genie+ available time for a ride within the same screen, in my experience it was worth risking losing your turn and frequently “refresh” the tip board screen for a better time. I was actually able to get a 9:50am time for the Slinky dog ride around 7:20am even though the best time I got around 7am was 2pm.
  • I noticed if you keep refreshing the window time keeps gradually getting worse but after a few “refreshes” it seems to reset to an earlier time. This may only apply in the morning, not necessarily later in the day as some Genie+ LL will get “sold out”
  • The Individual Lightning Lane passes for the most popular rides, i.e. "Rise of the Resistance" and "Remy's Ratatouille Adventure" will get sold out early in the day, so if you’re considering buying it and get a good time, don’t risk it and take it.

Strategies to minimize your time in line for the Individual Lightning Lane rides

I chose not to pay for any of the Individual LightningLane as I was already paying enough for the Genie+ pass and ParkHopper tickets. I stayed at a Disney Resort for 2 nights so I was able to leverage some of the resort benefits for 3 days. This is what we did to be able to minimize our wait time in line and be able to ride all of the Individual Lightning Lane rides (your mileage may vary):
  • Day 1: Magic Kingdom
    • We got inside the park around 30 minutes after opening time. We headed straight into Seven Dwarfs Mine train as it had a wait time of 40 minutes and we knew that was going to be as good as it gets. We waited around 35 minutes which was fairly reasonable. The other good time to get into this ride is right around the fireworks time, wait times can be as low as 20 minutes or less.
    • For Space Mountain we noticed the time was more variable. We tried going around 2pm when it was 40 minutes, but it was unfortunately broken, so we came back about 2 hours later, and waited around 45 minutes in line.


  • Day 2: Hollywood Studios
    • For Mickey & Minnie’s Runaway Railroad, the best time to get in is in the morning, wait times were as low as 30 minutes at opening time. We ended up going around 2pm when the wait time was around 45 minutes. It seem too much at the time, but I was pleasantly surprised. This ride is worth even longer wait time. It is one of the 3 new trackless rides at Disney World (along with Rise of the Resistance and Ratatouille). You’ll really enjoy it!
    • To get into "Rise of Resistance", since we were checking into a Disney Resort that day we were able to use the "early entry" admission, i.e. 30 minutes before opening time (9am). We got into the park around 8:40am and were in line around 8:50am when the advertised time was around 50minutes. We ended up doing around 40 minutes in line and this ride is definitely worth the wait time even if it's 2 hours.


  • Day 3: EPCOT, Animal Kingdom and back to Epcot
    • I had reservations for Epcot and joined the Virtual Queue right at 7am and got group 63 with an estimated wait time of 6 hours! This ended up being a hight estimate, as we got our turn to join the queue at 2:30pm, i.e. 4.5 hrs after park opening time. You get one hour to join the line, so avoid going outside the park close as your turn approaches. I noticed that there were around 163 groups per day before the passes are fully allocated and if you do not get in the queue on the 7am shift, there is another opportunity to get into the queue by 1pm.


    • I monitored the wait times (5-15 minutes) and noticed that they were very low for Everest Expedition right before closing time (6-7pm). We decided to hop and arrived into Animal Kingdom around 5:15, when the wait time was at 20 minutes. Unfortunately the ride was temporarily closed right before we got to the ride. We decide to go to Avatar Flight of Passage and barely made it back to Everest right past 7pm, but we were able to ride it twice with no wait time even though the park was already closed.


    • For Avatar Flight of Passage we got in line around 5:40pm and the wait time was 65 minutes. We ended up doing over 70 minutes, but we had done this ride before and knew it was worth it.
  • Day 4: Hollywood Studios (half day)
    • We decided to go back to Rise of the Resistance one more time. We got into the park entrance closer to 9am and even the resort entrance had a line. We entered the park right after 9am so we had to rush to the ride. By the time we got there, the ride was temporarily closed (bad luck). We went to Toy Story Mania (normal line) and then used a Genie+ LL entrance we had at 9:50am for Slink Dog Dash. We got back to the Resistance ride shortly after 10am and the wait time was already at 95 minutes. We ended up waiting in line close to 2hrs but this was our last ride for this trip and definitely worth the wait!


My verdict: is it worth paying for Genie+?

Compared to other parks, $15 per day seems inexpensive for line skipping, however for multi-day tickets or larger families it may be cost prohibitive. It was only a matter of time before Disney started charging for "FastPass" and the pandemic was a convenient timing to do this after "FastPass" was paused and by rebranding it as Genie+. In my opinion, they should discount the price for longer multi-day tickets similar to how they do for the base ticket price. Also there is nothing stopping Disney from increasing the price, specially if they have high demand for it. 

From my experience from this trip and given the current cost for a 4-day ticket and a family of 4, the time savings justified paying for Genie+ and I would still recommend it. If you are only going 1-3 days, they I would strongly recommend it. For over tickets over 4 days, I will likely skip buying it, as you will have more time to wait in line.


Tuesday, May 11, 2021

How to get headless chromium to launch from a pipeline using ubi8 image

My goal was to be able to run unit tests from a pipeline for the Angular's "Tour of Heroes" tutorial application which use Karma Jasmine framework. In this case the pipeline was built using Tekton to deploy to a Red Hat OpenShift cluster. 

Step 1: Change Karma Browser Configuration to use Headless Chromium

Launching the unit tests locally was not an issue because I had Chrome installed locally, but in order to get this to work in a pipeline we need to switch to a Headless browser configuration. This can be accomplished by updating karma.conf.js as follows. This configuration prunes all interactivity, not all of these settings are necessary, but these will work both locally and from the pipeline task:

   reporters: ['progress'],

    port: 9876,

    colors: true,

    logLevel: config.LOG_INFO,

    autoWatch: false,

    browserNoActivityTimeout: 30000,

    browsers: ['ChromiumHeadlessNoSandbox'],

    customLaunchers: {

      ChromiumHeadlessNoSandbox: {

          base: 'ChromiumHeadless',

          flags: ['--no-sandbox', '--headless', '--disable-gpu', '--disable-translate', '--disable-extensions', '--remote-debugging-port=9223']

      }

    },    

    singleRun: true,

    restartOnFileChange: false


Step 2: Add Puppeteer to the project

With these changes the local tests were running headless successfully, however they were still failing because they still need a browser binary downloaded. Our pipeline was using the ubi8/nodejs-12 image to run npm tasks. All of the npm tasks (e.g. install, lint, build) were running successfully, except for the test task. One easy solution would have been to install chromium into a modified image using a Dockerfile with ubi8/nodejs-12 as the base. Unfortunately the chrome download url was not whitelisted from the pipeline server and could not go that route. 

This led us to using puppeteer. Puppeteer is a node library which allows you to test using headless chromium. One of the features that we needed is that it downloads the chromium binary.

Step 2.1: Add puppeteer as a dev dependency

Puppeteer can be easily added as a development dependency by adding it to package.json within devDependencies section:

   "puppeteer": "^9.1.0",

Step 2.2: Export download host for puppeteer

This may not be an issue locally, but in case npm install gets stuck downloading puppeteer, this can be addressed by adding this download host environment variable prior to running npm install (ensure this is added to the pipeline task as well):


      export PUPPETEER_DOWNLOAD_HOST=https://npm.taobao.org/mirrors 


Step 2.3: Update karma configuration to use puppeteer

Update karma.conf.js with the following changes:

  • Require puppeteer
  • Export the path to the Chromium executable
  • Wait for chromium to launch (i.e. to ensure it is downloaded if applicable)

 const puppeteer = require('puppeteer');

  process.env.CHROMIUM_BIN = puppeteer.executablePath();

  (async () => {

    const browser = await puppeteer.launch({

      args: ['--no-sandbox', '--disable-setuid-sandbox'],

    });

  })();

Step 3: Add required Linux libraries to ubi8 image

At this point npm test should execute successfully with puppeteer and headless chromium. However tests were failing in our pipeline due to missing Linux libraries in the ubi8 required to run chromium:

06 05 2021 20:58:47.098:ERROR [launcher]: Cannot start ChromiumHeadless /workspace/source/node_modules/puppeteer/.local-chromium/linux-869685/chrome-linux/chrome: error while loading shared libraries: libnss3.so: cannot open shared object file: No such file or directory

To troubleshoot this error the following commands were instrumental:

Command #1 (from troubleshooting puppeteer)

This command will help troubleshoot which libraries are missing in one shot versus adding one library at a time and getting a different error. You can get the path to local-chromium by echoing the output of puppeteer.executablePath() - it should be very similar to the one below except for the linux version number:

ldd /workspace/source/node_modules/puppeteer/.local-chromium/linux-869685/chrome-linux/chrome | grep not

Command #2 (from troubleshooting puppeteer)

The second command that was helpful was to run yum whatprovides on each missing library from the Dockerfile building the custom image. The only caveat is that in a few cases what provides resolved to the i686 library and that did not provide the missing library instead I had to switch to the x86_64 library version.

yum what provides libnss3.so

Magic Dockerfile

The hardest part of this task was to arrive to the correct Dockerfile. After iterating through the commands above, we arrived to the right dockerfile what allowed Puppeteer running headless chromium successfully:

FROM registry.access.redhat.com/ubi8/nodejs-12:latest

USER root

RUN yum install -y alsa-lib.x86_64 atk.x86_64 cups-libs.x86_64 gtk3.x86_64 \

    libXcomposite.x86_64 libXcursor.x86_64 libXdamage.x86_64 \

    libXext.x86_64 libXi.x86_64 libXrandr.x86_64 libXScrnSaver.x86_64 \

    libXtst.x86_64 pango.x86_64 xorg-x11-fonts-Type1 libdrm-2.4.101-1.el8.x86_64 \

    mesa-libgbm-20.1.4-1.el8.x86_64 libxshmfence-1.3-2.el8.x86_64 nss.i686 \

    && yum update -y && yum clean all 

USER 1001

Hopefully this guides saves some time for others trying to get this to work on a ubi8 image!


Thursday, May 16, 2019

Spring Integration demo for exposing a SOAP Web Service which consumes another Web Service

Even in 2019, we often still need to develop SOAP based web services due to the need to integrate with legacy applications still using them. It was hard to find code samples that use Spring Integration with Java DSL using Spring Boot to expose/consume SOAP based web services. I put together an example which uses all of the above:
  1. initial branch shows an initial implementation of a web service exposed using spring-ws, Spring Boot and Java DSL. This was loosely based on the "Producing a SOAP web service" getting started guide.
  2. inboundgateway branch takes the initial branch and converts it to using Spring Integration classes (i.e. MarshallingWebServiceInboundGateway and MessageChannel). Credit to tomask79's spring boot web service integration repo which was one of few sample codes I found to expose a SOAP service using Spring Integration with Java DSL. In particular this commit will show you how easy it is to go from Spring-WS to a Spring Integration implementation.
  3. outboundgateway branch introduces a MarshallingWebServiceOutboundGateway to call into another SOAP web service to get order details. It also introduces the use of @EnableIntegrationGraphController annotation to build a visualization of the flow using spring-flow-si

The visualization tool output is fairly impressive:


However, I'm not convinced Spring Integration is the best fit for this particular use case, i.e. integration flows primarily between web services and some JMS services. Here are some of the things I did not like:
  1. Code flow becomes hard to follow. Flows are connected primarily via channels. I introduced a ChannelNames class with constants to make it easier to follow the flow, but even with this, I had to find usages of the constant and then navigate to those classes.
  2. The request/response web service methods had to be decoupled into a "request" (request channel) and "response" (reply channel) method. I posted this question in StackOverflow and even though this method could be combined using a MessageGateway, it is not the ideal way of implementing this with Spring Integration. Even with the diagram above, you cannot tell that orderInboundGateway is a 2-way flow, instead it appears a one-way flow.
Don't get me wrong, I liked several aspects of Spring Integration and I would find it useful for other scenarios, but it seems for this one, the complexity introduced outweighs some of the benefits. 

Please chime in the comments if you've successfully implemented similar scenarios with Spring Integration!